
AI-Powered Summary
- PayU's bulk payout feature allows businesses to process multiple transactions quickly using an Excel file without API integration.
- To initiate payouts, users must upload beneficiary details in a pre-formatted Excel template available on the PayU dashboard.
- The Excel file should include mandatory fields like MerchantReferenceID, BatchID, Amount, paymentType, and beneficiary details depending on the payment mode.
- Once uploaded, payouts are processed instantly, and successful transactions are assigned a UTR number for tracking.
- Errors in the file can be reviewed and corrected using the error file provided on the dashboard.
- This feature streamlines disbursements, reduces manual effort, and enhances business efficiency.
Use your MS Excel File to make bulk payouts in 3 easy steps without any API Integration
API integration might be the smoothest way to do payouts, but it is certainly not the quickest. Imagine that you’ve run an online competition and you want to distribute rewards to 500 winners. Or, you need to make weekly payouts to your vendors or delivery partners. You know their bank account and/or UPI details, but who has the time to initiate thousands of transactions one by one! This is where PayU’s bulk payout feature comes to the rescue. It doesn’t require any API integration; it doesn’t need you to provide beneficiary details one by one. Just dump the data in an Excel file, upload it on PayU dashboard and voila! The payouts are processed within seconds.
Want to streamline payouts in your business? Sign up to get started!
Make Bulk Payouts in 3 simple steps
- Open your Payouts Dashboard and Click on “Make a transfer”.
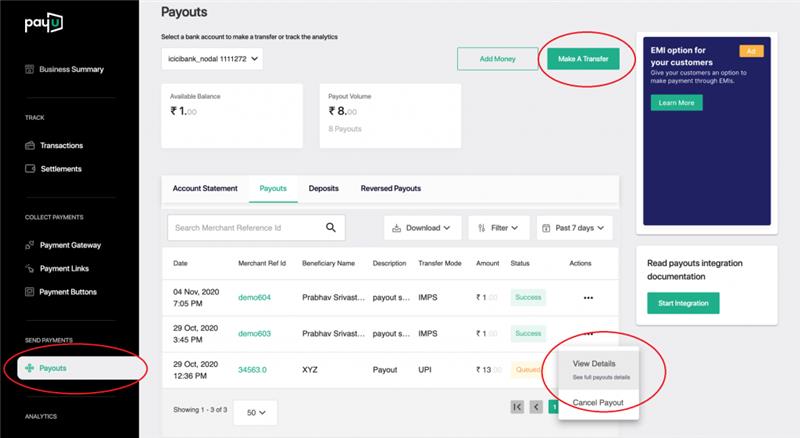
Do ensure you have sufficient balance before you initiate payouts! Go to “Add Money” for steps to update balance.
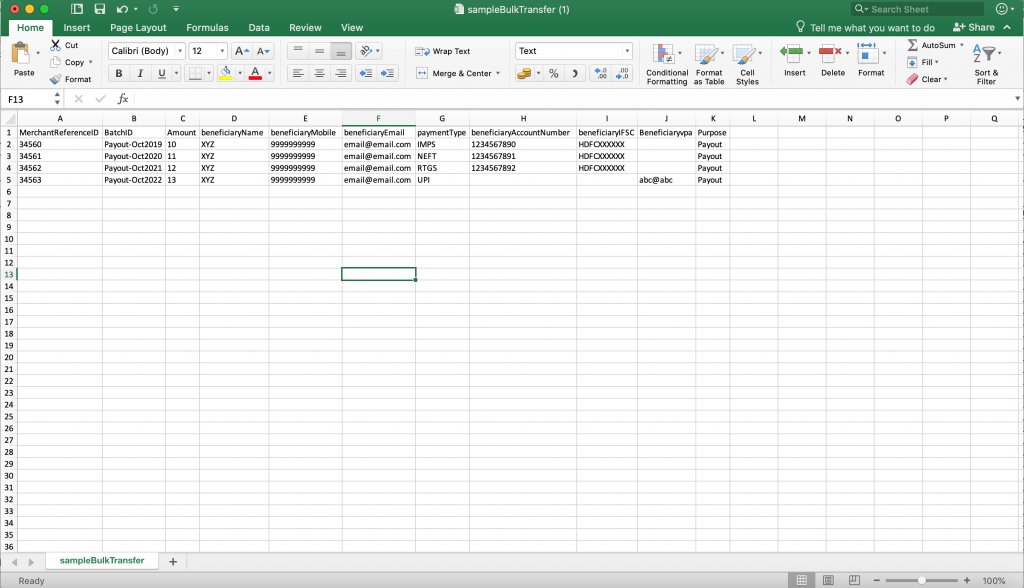
2. Download Sample Template from the Dashboard and add your data
- This file will contain all the column headers with sample data
- Replace the sample data with the details of your beneficiaries and amounts to be paid:
- MerchantReferenceID (Mandatory) – This is a unique ID to identify each transaction. This is a must so that you can refer to this payout at a later stage. Please make sure that this is unique at a transaction level, otherwise the payout won’t get processed
- BatchID (Mandatory) – This has to be provided by you so that you can identify the batch of bulk upload. Again, it is recommended that this should be unique at a file level; however there are no checks from our side on this
- Amount (Mandatory) – This is the amount which needs to be transferred
- beneficiaryName (Not Mandatory) – This is the name of the beneficiary
- beneficiaryMobile (Not Mandatory) – This is the mobile number of beneficiary
- beneficiaryEmail (Not Mandatory) – This is the email ID of beneficiary
- paymentType (Mandatory) – This is the mode with which Payout is to be triggered. It can be IMPS, NEFT, UPI, etc
- beneficiaryAccountNumber (Mandatory if mode is IMPS, NEFT, RTGS) – This is Bank Account Number of the beneficiary
- beneficiaryIFSC (Mandatory if mode is IMPS, NEFT, RTGS) – This is the IFSC code of the beneficiary’s bank account
- BeneficiaryVPA (Mandatory if mode is UPI) – This is the UPI ID of the beneficiary
- Purpose (Mandatory) – The information entered in this column will reflect in the bank statement of the beneficiary
- Replace the sample data with the details of your beneficiaries and amounts to be paid:
- Ensure
that the Excel file is in the right format
- Do not remove the column headers
- Once you have filled in all the details, select the entire sheet and change the format to “Text”
- Maximum file size can be 10 mb and maximum number of rows can be 1000
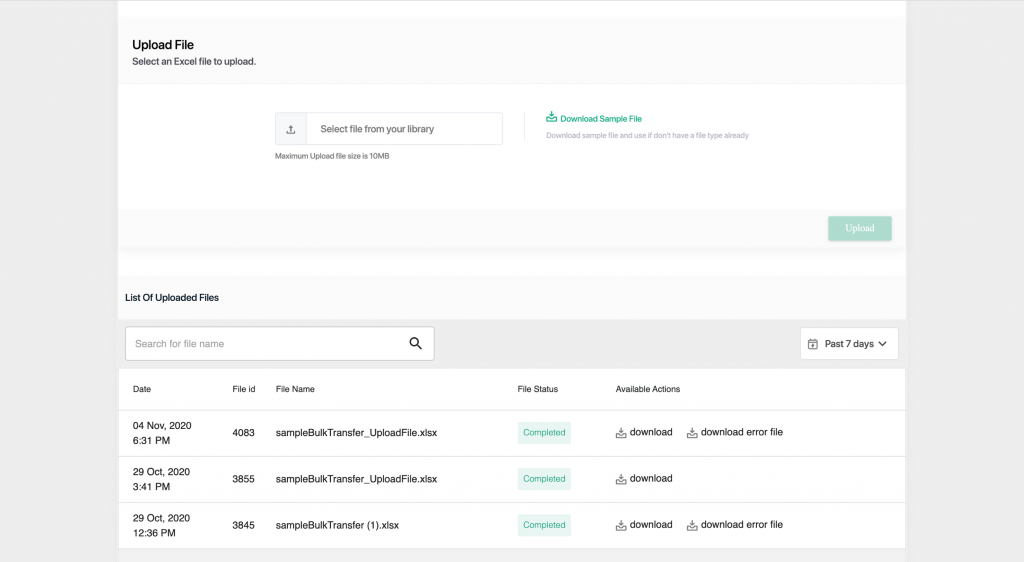
- Payouts will be queued for the rows in proper format. Such transactions can be viewed in the Payouts tab of the Dashboard. Once the transaction is successful, a UTR number can be found corresponding to every transaction
- In case of any errors, check them in the error file from the dashboard. For all the failed transactions, error details will be mentioned against each error file.
Still doing your payouts manually? Start using PayU Payouts and make your disbursements instant and easy.
Read more – What Are Payouts? Meaning, Examples, Types
Conclusion:
Payouts to multiple recipients on a regular or need basis are a routine and important part of any business. You can streamline and track your outflows by using the Excel sheet Payout feature on PayU. Automation will not only save you time and eliminate human errors, but also free up your mind-space for other critical business activities that you alone can do best! The PayU Bulk Payouts feature also offers a great customer experience, and ultimately helps you grow your business. So, get started today!


Leave a Comment